Archive for the ‘webmaster tools’ Category

Make the most of Search Queries in Webmaster Tools

Level: Beginner to Intermediate

If you’re intrigued by the Search Queries feature in Webmaster Tools but aren’t sure how to make it actionable, we have a video that we hope will help!


Maile shares her approach to Search Queries in Webmaster Tools

This video explains the vocabulary of Search Queries, such as:

  • Impressions
  • Average position (only the top-ranking URL for the user’s query is factored in our calculation)
  • Click
  • CTR

The video also reviews an approach to investigating Top queries and Top pages:

  1. Prepare by understanding your website’s goals and your target audience (then using Search Queries “filters” to support your knowledge)
  2. Sort by clicks in Top queries to understand the top queries bringing searchers to your site (for the given time period)
  3. Sort by CTR to notice any missed opportunities
  4. Categorize queries into logical buckets that simplify tracking your progress and staying in touch with users’ needs
  5. Sort Top pages by clicks to find the URLs on your site most visited by searchers (for the given time period)
  6. Sort Top pages by impressions to find valuable pages that can be used to help feature your related, high-quality, but lower-ranking pages

After you’ve watched the video and applied the knowledge of your site with the findings from Search Queries, you’ll likely have several improvement ideas to help searchers find your site. If you’re up for it, let us know in the comments what Search Queries information you find useful (and why!), and of course, as always, feel free to share any tips or feedback.

Written by Maile Ohye, Developer Programs Tech Lead

Webmaster Tools verification strategies

Webmaster level: all

Verifying ownership of your website is the first step towards using Google Webmaster Tools. To help you keep verification simple & reduce its maintenance to a minimum, especially when you have multiple people using Webmaster Tools, we’ve put together a small list of tips & tricks that we’d like to share with you:

  • The method that you choose for verification is up to you, and may depend on your CMS & hosting providers. If you want to be sure that changes on your side don’t result in an accidental loss of the verification status, you may even want to consider using two methods in parallel.
  • Back in 2009, we updated the format of the verification meta tag and file. If you’re still using the old format, we recommend moving to the newer version. The newer meta tag is called “google-site-verification, and the newer file format contains just one line with the file name. While we’re currently supporting ye olde format, using the newer one ensures that you’re good to go in the future.
  • When removing users’ access in Webmaster Tools, remember to remove any active associated verification tokens (file, meta tag, etc.). Leaving them on your server means that these users would be able to gain access again at any time. You can view the site owners list in Webmaster Tools under Configuration / Users.
  • If multiple people need to access the site, we recommend using the “add users” functionality in Webmaster Tools. This makes it easier for you to maintain the access control list without having to modify files or settings on your servers.
  • Also, if multiple people from your organization need to use Webmaster Tools, it can be a good policy to only allow users with email addresses from your domain. By doing that, you can verify at a glance that only users from your company have access. Additionally, when employees leave, access to Webmaster Tools is automatically taken care of when that account is disabled.
  • Consider using “restricted” (read-only) access where possible. Settings generally don’t need to be changed on a daily basis, and when they do need to be changed, it can be easier to document them if they have to go through a central account.

We hope these tips help you to simplify the situation around verification of your website in Webmaster Tools. For more questions about verification, feel free to drop by our Webmaster Help Forums.

Posted by John Mueller, Webmaster Trends Analyst, Zurich

Introducing Data Highlighter for event data

Webmaster Level: All

Update 19 February 2013: Data Highlighter for events structured markup is available in all languages in Webmaster Tools.

At Google we’re making more and more use of structured data to provide enhanced search results, such as rich snippets and event calendars, that help users find your content. Until now, marking up your site’s HTML code has been the only way to indicate structured data to Google. However, we recognize that markup may be hard for some websites to deploy.

Today, we’re offering webmasters a simpler alternative: Data Highlighter. At initial launch, it’s available in English only and for structured data about events, such as concerts, sporting events, exhibitions, shows, and festivals. We’ll make Data Highlighter available for more languages and data types in the months ahead. Update 19 February 2013: Data Highlighter for events structured markup is available in all languages in Webmaster Tools.

Data Highlighter is a point-and-click tool that can be used by anyone authorized for your site in Google Webmaster Tools. No changes to HTML code are required. Instead, you just use your mouse to highlight and “tag” each key piece of data on a typical event page of your website:
Events markup with Data Highlighter

If your page lists multiple events in a consistent format, Data Highlighter will “learn” that format as you apply tags, and help speed your work by automatically suggesting additional tags. Likewise, if you have many pages of events in a consistent format, Data Highlighter will walk you through a process of tagging a few example pages so it can learn about their format variations. Usually, 5 or 10 manually tagged pages are enough for our sophisticated machine-learning algorithms to understand the other, similar pages on your site.

When you’re done, you can review a sample of all the event data that Data Highlighter now understands. If it’s correct, click “Publish.”
From then on, as Google crawls your site, it will recognize your latest event listings and make them eligible for enhanced search results. You can inspect the crawled data on the Structured Data Dashboard, and unpublish at any time if you’re not happy with the results.

Here’s a short video explaining how the process works:

To get started with Data Highlighter, visit Webmaster Tools, select your site, click the “Optimization” link in the left sidebar, and click “Data Highlighter”.

If you have any questions, please read our Help Center article or ask us in the Webmaster Help Forum. Happy Highlighting!

Posted by , Product Manager

Rich snippets guidelines

Webmaster level: All

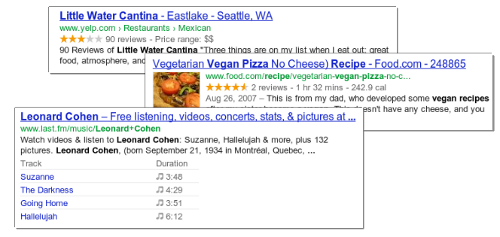
Traditional, text-only, search result snippets aim to summarize the content of a page in our search results. Rich snippets (shown above) allow webmasters to help us provide even better summaries using structured data markup that they can add to their pages. Today we’re introducing a set of guidelines to help you implement high quality structured data markup for rich snippets.

Once you’ve correctly added structured data markup to you site, rich snippets are generated algorithmically based on that markup. If the markup on a page offers an accurate description of the page’s content, is up-to-date, and is visible and easily discoverable on your page and by users, our algorithms are more likely to decide to show a rich snippet in Google’s search results.

Alternatively, if the rich snippets markup on a page is spammy, misleading, or otherwise abusive, our algorithms are much more likely to ignore the markup and render a text-only snippet. Keep in mind that, while rich snippets are generated algorithmically, we do reserve the right to take manual action (e.g., disable rich snippets for a specific site) in cases where we see actions that hurt the experience for our users.

To illustrate these guidelines with some examples:

  • If your page is about a band, make sure you mark up concerts being performed by that band, not by related bands or bands in the same town.
  • If you sell products through your site, make sure reviews on each page are about that page’s product and not the store itself.
  • If your site provides song lyrics, make sure reviews are about the quality of the lyrics, not the quality of the song itself.

In addition to the general rich snippets quality guidelines we’re publishing today, you’ll find usage guidelines for specific types of rich snippets in our Help Center. As always, if you have any questions or feedback, please tell us in the Webmaster Help Forum.

Posted by Jeremy Lubin, Consumer Experience Specialist, & , Webmaster Trends Analyst